Table of Contents
Connecting the Spider System to the PC
In this section, we discuss IP connectivity between Spider and PC.
When each Spider is shipped, unless the user has requested otherwise, it is set by default to a static IP address starting with 172.0.0.x
The IP settings of the Spider can be changed with the Front-End IP Address Setup Tool that was installed with EDM. This tool is located in the EDM installation folder. It is called “Front-End IP config.exe”.
Network configuration
The Spider modules and PC need to be on the same subnet to detect each other:
- First three numbers of IP address must match
- Fourth number must be unique for each device.
By default, the Spider modules are configured on the 172.0.0.x subnet:
- Spider(s) IP address start: 172.0.0.100
- Spider(s) subnet mask: 255.255.255.0
Set your PC IP address to another static IP address on 172.0.0.x:
- PC IP address: 172.0.0.50 or similar
- PC subnet mask: 255.255.255.0
- PC default gateway: none
How to set PC IP address
- Search for “View Network Connections” in the Start menu
- Right-click on the network adapter
- Click Properties
- Select “Internet Protocol Version 4 (TCP/IPv4)” and click “Properties”
- Select “Use the following IP address:”
- Enter IP settings (e.g., 172.0.0.50 / 255.255.255.0)
How to set Spider IP address
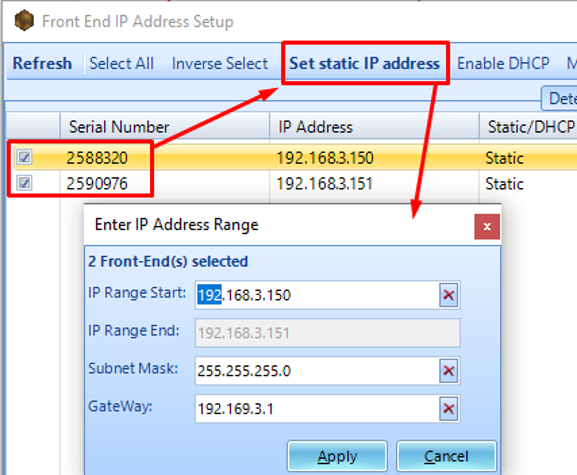
Open Front-End IP Address Setup Tool (use the Windows search menu).
Select the module(s) and click Set static IP address. Fill in the IP address(es), subnet mask, and gateway as needed. The LED on the Spider will flash for a couple seconds, indicating that the new IP has been assigned.
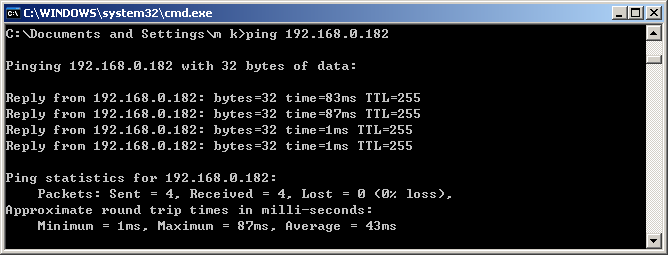
To verify the network connection, use the PING command in the Command Prompt window on the PC. In the Windows Start Menu, select Run, type ping 192.168.0.182, and press enter.
Replace 192.168.0.182 with the configured IP address of the device.
If it is correctly configured, the ping command will receive responses, as shown below.
Troubleshooting
If for some reason the PC does not detect the spider devices or one day the PC no longer detects spider devices despite it used to just yesterday or last week, then there are some initial checks or solutions to try below:
Disable other networks
Temporarily disable all other network adapters and only connect one Spider to the PC.
Search for “View Network Connections” in the Start menu and then right-click on all other network adapters to disable them.
If you wish to operate with the other networks turned on, see the below section “Dealing with multiple networks”.
Set network priority
If disabling other adapters is not an option, you can also raise the priority of the Spider network adapter.
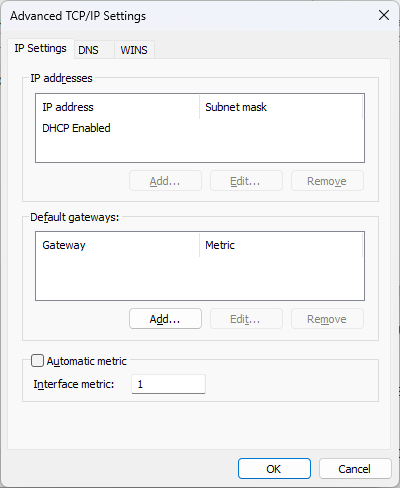
Right-click on the Spider network adapter, go to Properties > select “Internet Protocol Version 4 (TCP/IPv4)” > Properties > Advanced, uncheck Automatic metric and set Interface metric to 1 (lower is higher priority)
Power adapters
Check the power adapter of the Spiders. Devices with inadequate power can seem turned on while not functioning properly,
Check Ethernet ports
Try using a different Ethernet port or a separate USB-to-Ethernet adapter. Check the Ethernet connector lights are blinking to indicate a live connection.
Reset DNS cache
Reset the DNS cache (open Command Prompt and type in “ipconfig /flushdns” and press Enter.
> ipconfig /flushdns
Windows IP Configuration
Successfully flushed the DNS Resolver Cache.
Resetting the Spider
If all else fails, individual Spider modules can be reset to:
- IP address: 192.168.1.153
- Subnet mask: 255.255.255.0
- Default gateway: 192.168.1.5
How to reset IP address to factory default settings:
- Press and hold the Reset pin (you’ll need a paper clip or similar) at the back of the unit for 4-10 seconds until the internal relays click
For the Spider-81, it is recommended to use the front panel LCD and menu buttons to make changes to the IP settings.
How to reset firmware and IP address: if the above reset fails, there is a more aggressive reset function for both IP and DSP settings. This resets the DSP firmware version back to a base 1.0.0.4.
- Turn off Spider
- Press and hold the Reset pin
- While the Reset pin is still pressed, press the Power button
- Release the Reset pin
For Spider-80X/Xi units, the Play and Stop button LEDs will alternating blink if the reset was successful
After this reset, the unit should be detectable on the network using EDM or Front-End IP Address Setup. The firmware will need to be updated again from EDM.
Dealing with multiple networks
If your PC is connected to multiple networks (i.e., Internet, office network), it will have multiple IP addresses.
These multiple networks should not have overlapping IP ranges. Otherwise, our software may look on the wrong network for your Spider.
In the below example, the office network already uses the 172.0.0.x subnet, so the Spiders should be configured to another subnet, such as 10.0.0.x
What are my other office subnets?
Open the Command Prompt by typing cmd in your Windows start menu.
Type ipconfig
This will print out a list of all existing office subnets for your PC. The format should look like:
Wireless LAN adapter Wi-Fi:
IPv4 Address. . . . . . . . . . . : 172.0.0.100
Subnet Mask . . . . . . . . . . . : 255.255.255.0
Default Gateway . . . . . . . . . : 172.0.0.1
Alternative subnets to consider
For a private network when using the Spider, any combination of IP values between 0.0.0.0 and 255.255.255.255 can be used. Below are some popular IP schemas that are popular in the IT practice:
172.0.0.x subnet
By default, all Spider devices are sent out with static IP addresses starting at 172.0.0.100. We recommend setting your PC to an IP address like 172.0.0.50 for the quickest setup.
- PC IP address: 172.0.0.50
- Spider IP addresses: 172.0.0.100, 172.0.0.101, …
- Subnet mask: 255.255.255.0
- Default gateway: (blank)
10.0.0.x subnet
If your PC is already connected to another network (e.g., office Internet) that uses the 172.0.0.x subnet, consider the 10.0.0.x network.
- PC IP address: 10.0.0.50
- Spider IP addresses: 10.0.0.100, 10.0.0.101, …
- Subnet mask: 255.255.255.0
- Default gateway: (blank)
192.168.1.x subnet
- PC IP address: 192.168.1.50
- Spider IP addresses: 192.168.1.100, 192.168.1.101, …
- Subnet mask: 255.255.255.0
- Default gateway: (blank)


